Select the desired topic to discover frequently asked questions and our technical answers
Warning: the motorization, as well as the controls and accessories, must be installed by a professional in building motorization and automation, in accordance with SIMU's instructions and the regulations applicable in the country of commissioning.
General Questions
-
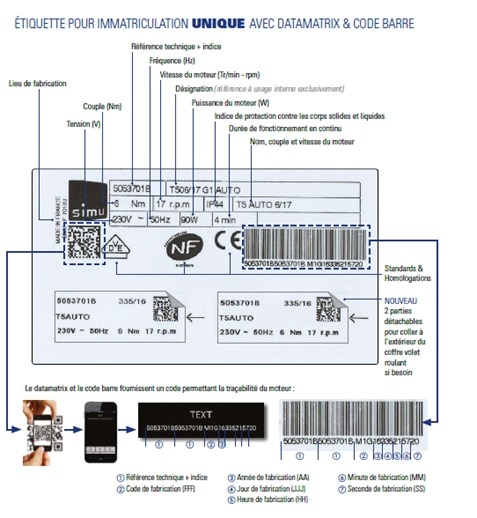
You will find the useful information for identification on the motor's label:
-
Visit the dedicated page, and use the online calculator, abacus files, or customized abacus form
-
Visit the dedicated page
-
Find our dealers list on the dedicated page
-
If you are an INDIVIDUAL or a PROFESSIONAL NOT A DIRECT SIMU CUSTOMER:
Please contact your installer or dealer to find out the warranty conditions provided to you
If you are a PROFESSIONAL DIRECT SIMU CUSTOMER:
The warranty conditions apply in full, write to us via the contact form
FAQ produits
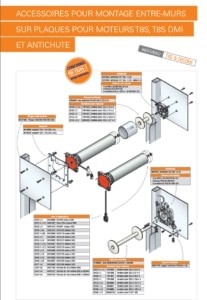
Adaptor Sets
-
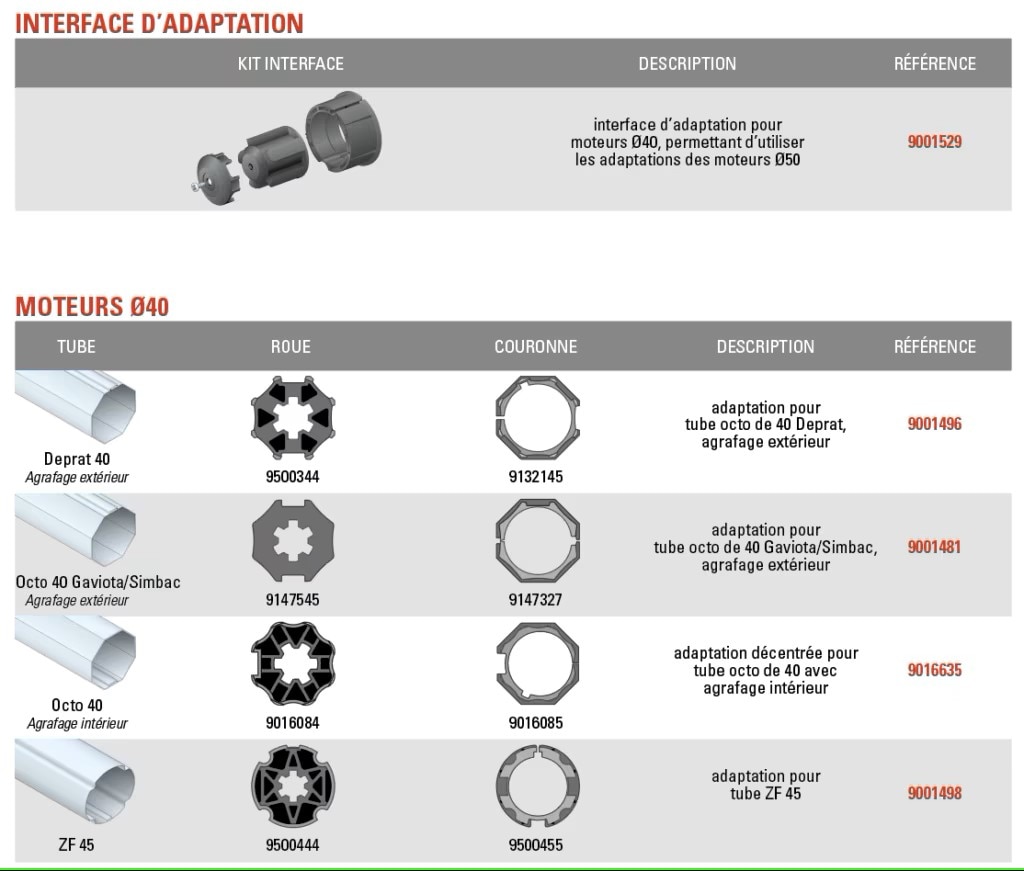
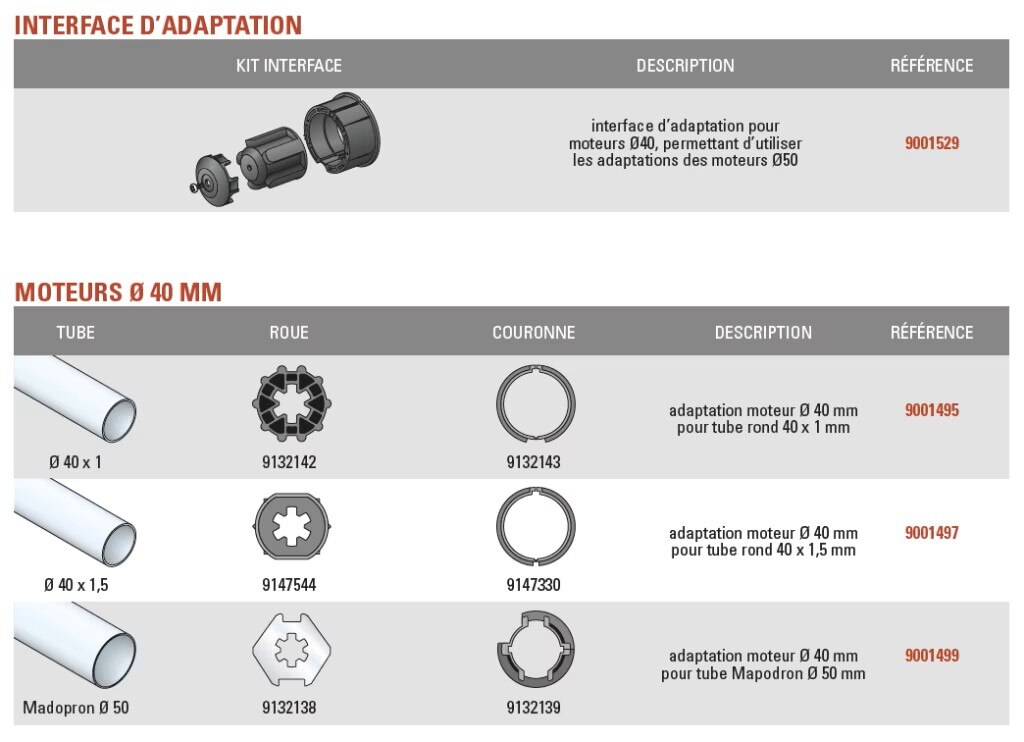
What adaptations are available for ø 40 motors?
What adaptations are available for ø 50 motors?
What adaptations are available for ø 60 motors?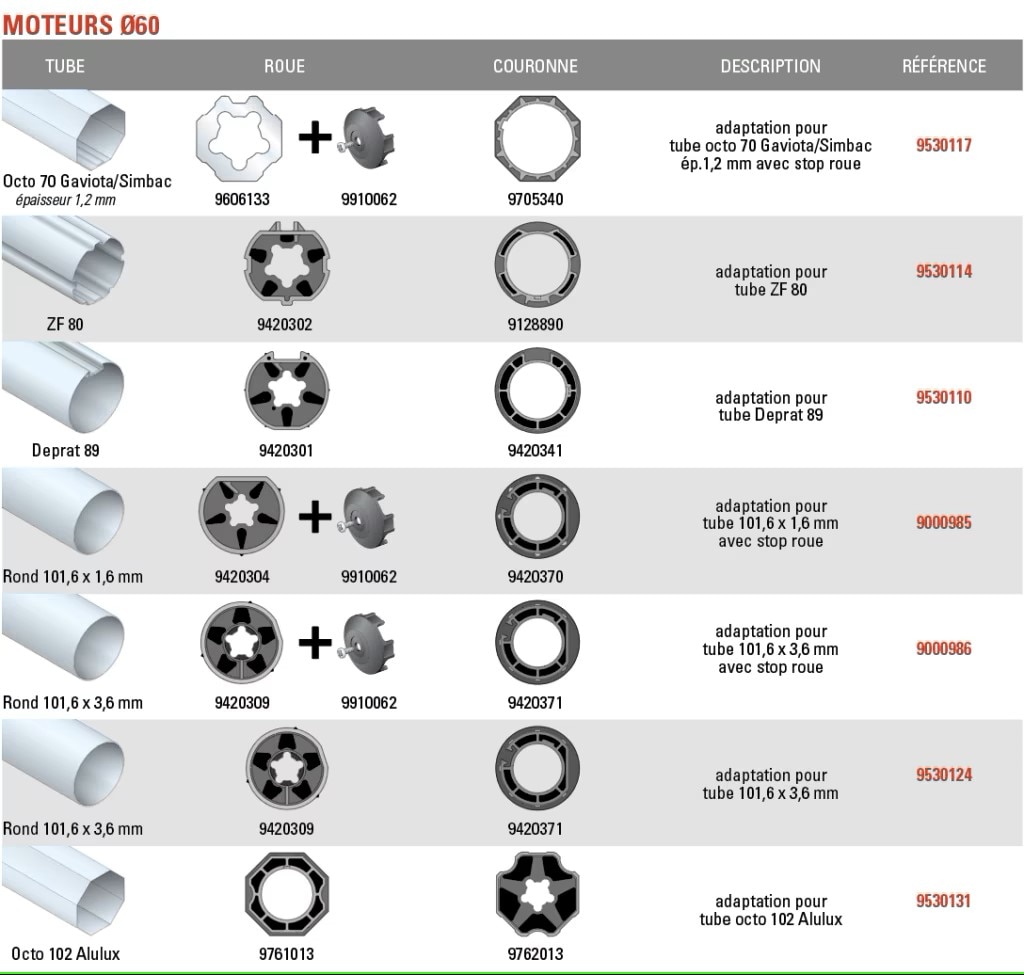
-
What adaptations are available for ø 40 motors (all T3.5 motors)?
What adaptations are available for ø 50 motors (all T5 and DMI5 motors)?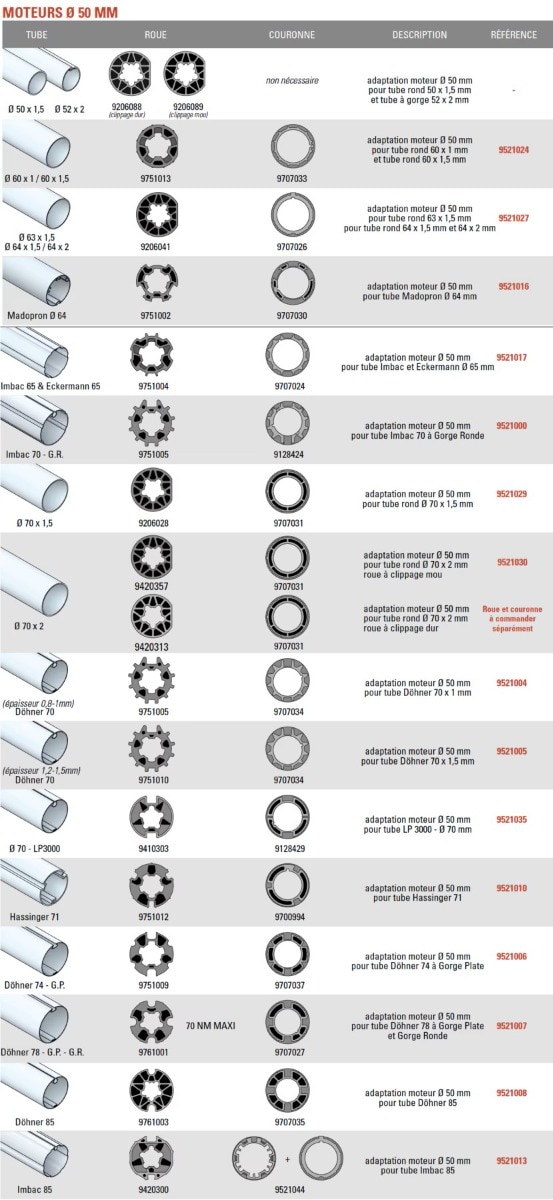
What adaptations are available for ø 60 motors (all T6 and DMI6 motors)?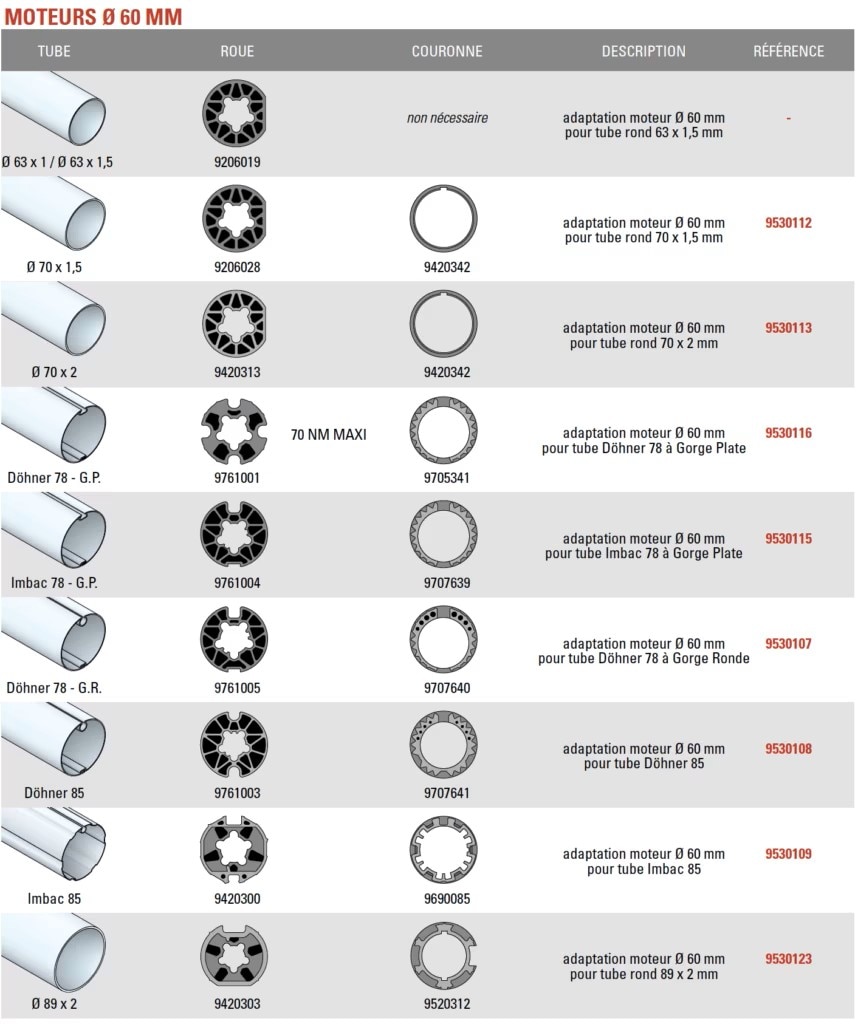
-
What adaptations are available for ø 60 motors (all T6 and DMI6 motors)?
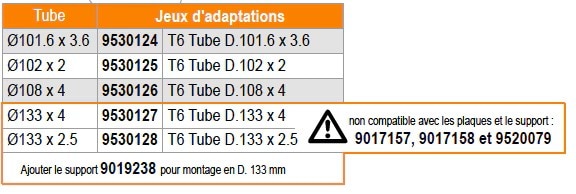
What adaptations are available for ø 89 motors (all T835 and T835M / T940 and T940M / T950 and T950M / T960 and T960M motors)?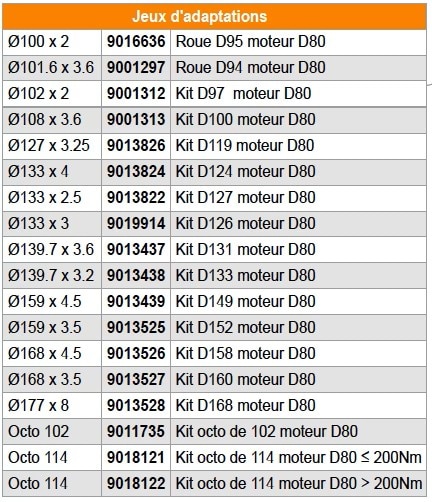
What adaptations are available for T980 and T980M motors?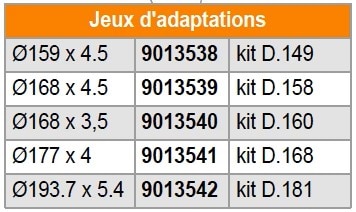
Control board - Grouped control box
-
Which motors are compatible with this product?
Compatible with motors T3.5, T5, DMI5, T6, DMI6, T815, T8S, T8S DMI, CENTRIS M and CENTRIS L
-
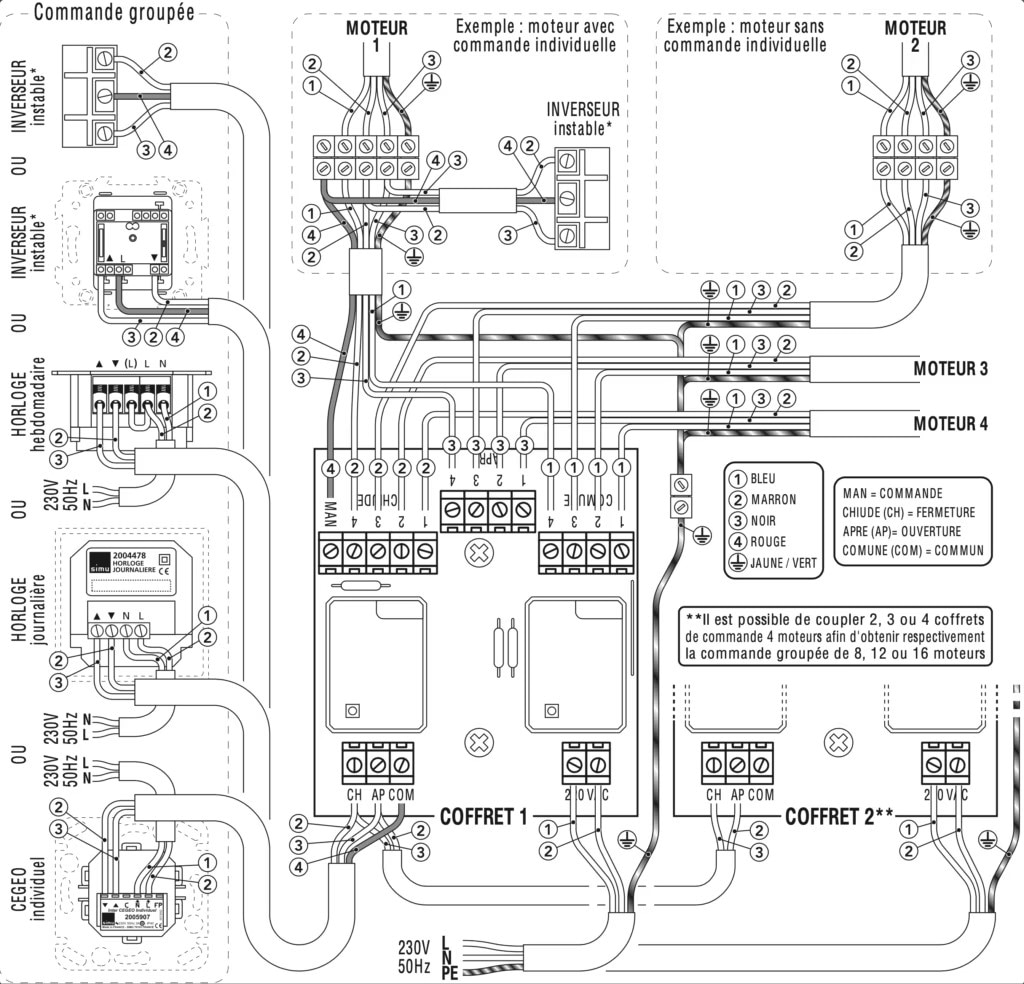
How to wire the product?
Transmitter - Wall 1&5C Hz&BHz;
-
What are the detailed characteristics of the product?
See the product sheet for Simu Hz 1 channel transmitters
See the product sheet for Simu Hz 5 channel transmitters

See the product sheet for the Memory Hz transmitter

See the product sheet for Simu BHz radio transmitters

How to differentiate a transmitter for Hz motor and a transmitter for Bhz motor?The difference is made by the color of the indicator:
red indicator = transmitter for Hz motor
green indicator = transmitter for Bhz motor
-
How to add a transmitter to an existing installation?
1. Press the PROG (programming) button on the individual control until the motor moves back and forth.
2. Press the PROG (programming) button on the transmitter to be added for 1 second, the motor moves back and forth to confirm the addition.
Your new transmitter is paired.
How to replace a defective or lost transmitter on a radio motor?1. Only on the concerned motor, disconnect the power supply for 3 seconds.
2. Reconnect the power supply for 8 seconds.
3. Disconnect the power supply again for 3 seconds.
4. Finally, reconnect the power supply. The motor moves back and forth.
5. Press the PROG (programming) button on the new transmitter to pair (about 3 seconds) until the motor moves back and forth.
Your new remote is paired with the motor. -
Current Simu Hz transmitters can replace your old products (Color+, Color, Wall ND, Hz Clock). However, the Simu BHz range is not compatible with Hz installations.
Transmitter - Timer easy - Timer multi
-
Timer Easy has one channel and allows one 'up' command and one 'down' command per day. The scheduled times can be identical every day or different between work days and rest days. Timer Multi has 6 channels and allows up to 6 commands for each day of the week.
-
How to add my timer multi remote to my radio motor?
1. Press the PROG (programming) button on the individual control until the motor moves back and forth.
Make sure you are on the right channel then press the PROG (programming) button on the Timer Multi for 1 second, the motor moves back and forth to confirm the addition. Your Timer Multi is paired.
How to add my timer easy remote to my radio motor?1. Press the PROG (programming) button on the individual control until the motor moves back and forth.
2. Press the PROG (programming) button on the Timer Easy for 1 second, the motor moves back and forth to confirm the addition. Your Timer Easy is paired.
Is it possible to control multiple motor groups?
It is possible to create up to 6 groups with the Timer Multi only
How many motors can my timer multi or easy control?
There is no limit to the number of products a remote can control; the only limit is range, which is ~200m in open field and ~20m through 2 reinforced concrete walls. -
My remote no longer controls the motors
Check the battery status and replace it if necessary. Try pairing your remote again.
I cannot add the remote to my motor.It is possible that the memory of your motor is full: 12 transmitters max.
Motor - AUTOSUN 2 solar solution
-
Discover the product video.
-
Which product is right for you?
-
Compatibility with SOMFY commands
Somfy RTS commands are compatible with the SIMU Hz radio motor range, including Autosun.
Compatibility of AUTOSUN 1 version with AUTOSUN 2 version
To connect an AUTOSUN 2 motor to your AUTOSUN 1 installation or to install an AUTOSUN 2 battery on your AUTOSUN 1 installation
-
HOW TO INSTALL A ROLLER SHUTTER EQUIPPED WITH AUTOSUN?
Discover how easy it is to install a roller shutter equipped with a standalone tubular motor, thanks to its battery and solar panel!
Click here to watch the tutorial YOUTUBE (FR)
HOW TO ADD A SECOND CONTROL POINT?
Add a second transmitter to your AUTOSUN 2 solar solution.
1. Press the PROG (programming) button on the individual control until the motor moves back and forth.
2. Press the PROG (programming) button on the control until the motor moves back and forth. Your new transmitter is paired.
Click here to watch the tutorial YOUTUBE
HOW TO ADD A DIGICODE?Steps to follow:
1. Open the Hz radio digicode with the provided key.
2. Press the RESET button on the digicode for more than 1 second (behind the keypad).
3. Press the individual PROG transmitter on the motor for 3 seconds => the motor moves back and forth.
4. Type the factory code (000000) on the digicode.
5. Briefly press the digicode SET key.
6. Press the PROG button on the digicode for more than 1 second (behind the digicode keypad) => 1 led blinks.
7. While blinking, press a channel (1 of the 2 large buttons) until the motor moves back and forth.
8. The digicode is programmed. The code can be modified.Click here to see the manual ref. 5050593A-Digicode SAHz
HOW TO ADD A GENERAL REMOTE CONTROL?1. Press the PROG (programming) button on the individual control until the motor moves back and forth.
2. Press the PROG (programming) button on the general remote control for 1 second; the motor moves back and forth to confirm the addition.
3. Repeat the same operation on all shutters to be added. Please note that if you already have a multi-channel remote control, do not forget to select the correct channel before pairing.
Click here to watch the tutorial YOUTUBE
HOW TO PAIR A TRANSMITTER AFTER A MALFUNCTION OR LOSS OF THE INITIAL TRANSMITTER?1. Disconnect the solar panel from the motor.
2. Unplug the motor battery for 3 seconds.
3. Reconnect the battery to the motor for 8 seconds.
4. Disconnect the battery from the motor again for 3 seconds.
5. Reconnect the battery to the motor, the motor moves back and forth.
6. Press the PROG (programming) button on the new transmitter to pair (about 3 seconds) until the motor moves back and forth. Your new remote is paired with the motor.
7. Reconnect the solar panel
HOW TO REMOVE A CONTROL POINT?1. Press the PROG (programming) button on the individual transmitter until the motor moves back and forth.
2. Press the PROG (programming) button on the transmitter to be removed for 1 second, the motor moves back and forth to confirm the removal. The remote is de-programmed.
WHICH END LIMIT MODE TO SELECT?Discover the 4 different ways to set your motor from the Electronic Radio Motor range depending on your installation. FULL AUTOMATIC, SEMI-AUTOMATIC LOW, SEMI-AUTOMATIC HIGH, and MANUAL mode
Click here to watch the tutorial YOUTUBE
HOW TO PROGRAM THE MOTOR IN MANUAL MODE?1. Simultaneously press the UP and DOWN buttons until the motor moves back and forth.
2. Check the rotation direction using the UP and DOWN buttons; if the direction is reversed, press the STOP button until the motor moves back and forth.
3. Using the UP and DOWN buttons, move the shutter to the desired lower position: during this operation, continue to hold down the emitter buttons to lower or raise the shutter.
4. Once the shutter is correctly positioned, press both STOP and UP buttons simultaneously until the shutter begins to move. The shutter should raise on its own (do not press the button).
5. Using the STOP button, stop the shutter at the top.
6. Using the UP and DOWN buttons, adjust the desired upper position.
7. Once the shutter is correctly positioned, press both STOP and DOWN buttons simultaneously until the shutter begins to move. The shutter should descend on its own (do not press the button).
8. When the shutter is halfway down, press and hold the STOP button until the motor performs a back-and-forth movement (about 5 seconds).
9. Press the PROG (programming) button until the motor moves back and forth. The motor is programmed.Click here to watch the tutorial YOUTUBE
HOW TO PROGRAM THE MOTOR IN FULLY AUTOMATIC MODE?FULLY AUTOMATIC mode, when the upper and lower end limit are automatically set.
Click here to watch the tutorial YOUTUBE
HOW TO PROGRAM THE MOTOR IN SEMI AUTO LOW MODE?SEMI AUTO LOW mode, when only the LOWER limit is set automatically.
Click here to watch the tutorial YOUTUBE
HOW TO PROGRAM THE MOTOR IN SEMI AUTO HIGH MODE?SEMI AUTO HIGH mode, when only the UPPER limit is set automatically.
Click here to watch the tutorial YOUTUBE
HOW TO REVERSE THE ROTATION DIRECTION WHEN THE MOTOR IS ALREADY PROGRAMMED?1. Position the shutter in the middle.
2. Simultaneously press the UP and DOWN buttons until the motor moves back and forth.
3. Within 2 seconds of the movement, press the STOP button until the motor moves back and forth again.
The rotation direction is reversed.
HOW TO MODIFY THE FINAL LIMITS?End limits can only be modified if the motor has been programmed in “manual” mode.
1. Position the shutter at its current end limit.
2. Press the UP and DOWN buttons simultaneously until the motor moves back and forth.
3. Position your roller shutter in the new position using the UP and DOWN buttons.
4. Press the STOP button until the motor moves back and forth. The new position is recorded.
HOW TO SAVE OR DELETE AN INTERMEDIATE POSITION (IP)?If you want to save or delete an intermediate position on a roller shutter equipped with the AUTOSUN 2 solar solution…
Click here to watch the tutorial YOUTUBE
HOW TO CANCEL PROGRAMMING AND RETURN TO FACTORY SETTINGS (MOTOR RESET)?1. Disconnect the solar panel from the motor.
2. Unplug the motor battery for 3 seconds.
3. Reconnect the battery to the motor for 8 seconds.
4. Disconnect the battery from the motor again for 3 seconds.
5. Reconnect the battery to the motor, the motor moves.
6. Press the PROG (programming) button for about 10 seconds until the motor moves twice back and forth within seconds. The motor is in factory settings and ready to be programmed.
7. Reconnect the solar panel
Click here to watch the tutorial YOUTUBE
HOW TO CHARGE A BATTERY?1. Unplug the motor battery.
2. Connect the battery to the charger reference 9020638. Minimum 3 hours.
3. Reconnect the battery to the motor.
After charging, the battery should have a voltage of about 13 volts.
HOW TO PUT THE RADIO TO SLEEP?This is only possible within a maximum of 10 minutes after programming the motor and with only one associated control point: Simultaneously press the 3 UP/STOP/DOWN buttons until the motor moves back and forth for about 3 seconds. The motor is asleep.
Click here to watch the tutorial YOUTUBE
HOW TO WAKE UP THE RADIO?It is only possible to wake up the radio if the panel is connected to the motor and lit, and can only be done with the transmitter paired during programming. Simultaneously press both UP/DOWN buttons until the motor moves back and forth for about 10 seconds. The motor is reactivated.
Click here to watch the tutorial YOUTUBE
-
THE SHUTTER LOWERS WITH A JERKY MOVEMENT
1. Check for issues (slats sticking, for example)
2. Charge the battery.
MY REMOTES DO NOT PROPERLY CONTROL MY SHUTTERS AFTER ADDING A GENERAL REMOTE
1. Disconnect the solar panel from the motor.
2. Unplug the motor battery for 3 seconds.
3. Reconnect the battery to the motor for 8 seconds.
4. Disconnect the battery from the motor again for 3 seconds.
5. Reconnect the battery to the motor, the motor moves back and forth.
6. Press the PROG (programming) button on the individual transmitter for about 3 seconds until the motor moves back and forth once.
Your remote control is re-paired, and the others no longer control the motor.
THE MOTOR RISES AFTER REACHING THE LOWER END LIMIT
1. Disconnect the solar panel from the motor.
2. Unplug the motor battery for 3 seconds.
3. Reconnect the battery to the motor for 8 seconds.
4. Disconnect the battery from the motor again for 3 seconds.
5. Reconnect the battery to the motor, the motor moves back and forth.
6. Press the PROG (programming) button for about 10 seconds until the motor moves twice back and forth within seconds. The motor is factory configured and ready to be programmed.
7. Completely program the motor.
THE MOTOR NO LONGER RESPONDS TO COMMANDS1. Check the remote control battery.
2. Check that the LED flashes when pressing a button on the remote control.
3. Check motor/battery/panel connections.
4. Check battery voltage: it should be above 11.5 volts.
5. Check solar panel voltage: Panel voltage 21 volts +/- 10%.
WHAT IS THE DIFFERENCE BETWEEN AUTOSUN 1 AND AUTOSUN 2?
1. Check the motor connectors:
Autosun 1 motor => One 4-point connector.
Autosun 2 motor => Two 2-point connectors.
Use the online calculator
Check the battery:
Autosun 1 battery => presence of a small circuit board with a reset button.
Autosun 2 battery => no circuit board.
HOW TO MODIFY YOUR AUTOSUN 1 INSTALLATION?To connect an AUTOSUN 2 motor to your AUTOSUN 1 installation or to install an AUTOSUN 2 battery on your AUTOSUN 1 installation
Click here to see how to replace the battery
Click here to see how to replace the motor
HOW TO REPLACE AUTOSUN 1 MOTOR WITH THE NEW AUTOSUN 2 MOTOR?
How to replace the motor of your AUTOSUN 1 solar solution with the new AUTOSUN 2 motor?Click here to see how to replace the motor
HOW TO REPLACE AUTOSUN 1 BATTERY WITH THE NEW AUTOSUN 2 BATTERY?
How to replace the battery of your AUTOSUN 1 solar solution with the new AUTOSUN 2 battery?
-
How to replace AUTOSUN1 with AUTOSUN2?
To connect an AUTOSUN 2 motor to your AUTOSUN 1 installation or to install an AUTOSUN 2 battery on your AUTOSUN 1 installation
Motor - Centris central motor
-
Where can I find the product manual?
-
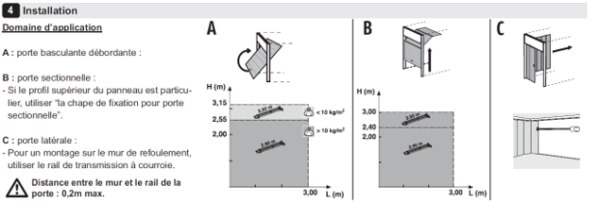
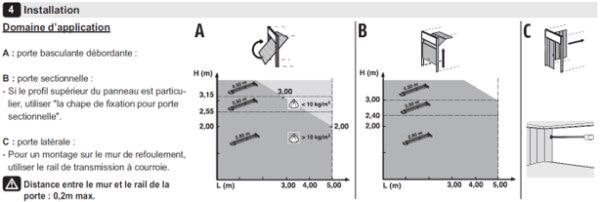
How is this product installed?
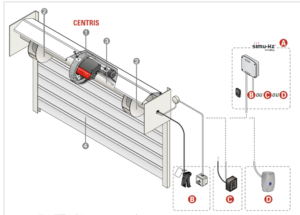
For more info, refer to the motor manual
How is this product installed on a ø 60 tube?
How is this product installed on a ø 76 tube?
-
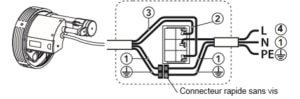
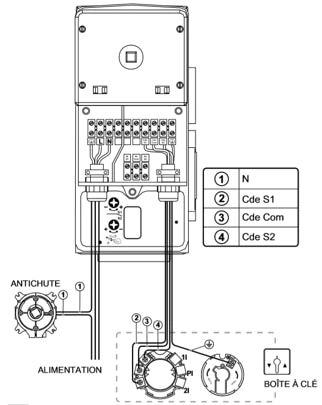
How to wire this product?
How to install the key switch with disengagement?
How to install the secure box with disengagement? -
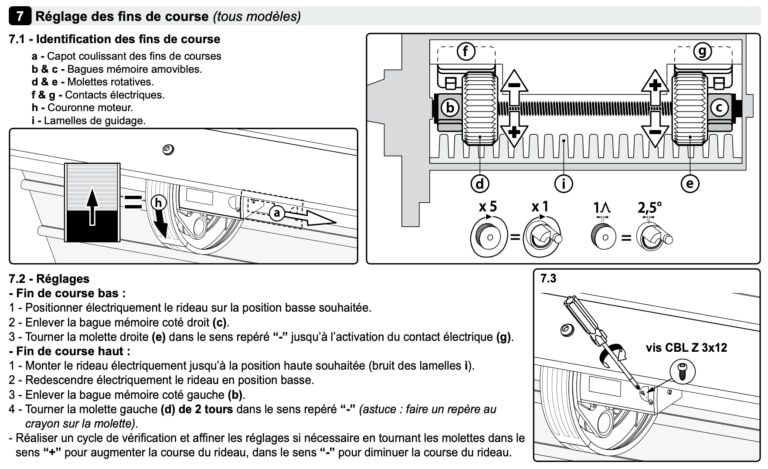
How to adjust the end limits?
The motorized product rotates without driving the curtainThe disengagement is active: check that the disengagement cable is not wound or that the disengagement lever is disengaged
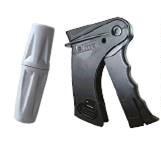
How to disengage a motor?Disengage the motor using the provided handle, or using the disengagement box.
The motor only rotates in one direction1. Check the operation by connecting the motor directly.
2. Check the curtain compensation.
The motor stops before its end limit1. Check the curtain compensation
2. Perform an end limit readjustment
The motor has lost its end limits1. Perform an end limit readjustment.
2. Check the gear condition and realign them
Can I return my motor to after-sales service or order spare parts?For any inquiries concerning after-sales service, contact your supplier or installer. No replacement parts are marketed
-
Which motor can replace an MC Pro?
The MC Pro motor is no longer produced and can be replaced by a Centris. You need to check the ø of the winding tube (60 or 76), the ø of the crown (200, 220 or 240), as well as the motor torque
Motor - GM600-GM800-GM1000 for garage door
-
What are the abacuses for the GM600?
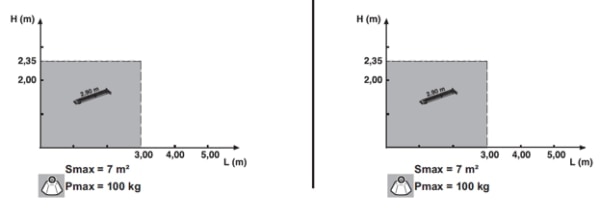
What are the abacuses for the GM800?
What are the abacuses for the GM1000?
-
Where can I find the GM 800 manual?
Where can I find the GM1000 manual? -
Digicode How to add a digicode to a GM 600?
1. Open the digicode with the provided key
2. Press and hold the RESET button on the digicode for more than 1 second (behind the keyboard)
3. Unlock the digicode by entering the factory code (000000)
4. Press button B on the GM until the light turns on
5. Press the chosen channel (1 of the 2 large buttons) on the digicode => the light blinks for 5s and turns off
6. Modify the factory code
How to add a digicode to a GM 800?1. Open the digicode with the provided key
2. Press and hold the RESET button on the digicode for more than 1 second (behind the keyboard)
3. Unlock the digicode by entering the factory code (000000)
4. Press the PROG button on the GM until the light turns on
5. Press the chosen channel (1 of the 2 large buttons) on the digicode => the light blinks for 5s and turns off
6. Modify the factory code
How to add a digicode to a GM 1000?1. Open the digicode with the provided key
2. Press and hold the RESET button on the digicode for more than 1 second (behind the keyboard)
3. Unlock the digicode by entering the factory code (000000)
4. Press and hold for 2S the PROG button on the GM => the light turns on and F0 is displayed
5. Press the chosen channel (1 of the 2 large buttons) on the digicode => the light blinks for 5s and 2 dashes are displayed on the screen, then C1 is displayed
6. Modify the factory code
Rails Can the rails be shortened?Yes, but the belt or chain must be shortened.
-
The door opens by itself after reaching the lower limit
Perform a reset and carry out new programming, as the door presses against the threshold, triggering obstacle detection.
The door opens by itselfPerform a reset and carry out new programming.
Range issueAdd a remote antenna, reference 9015167, cable length 8m.
Motor - Simubox
-
Where can I find the product manual?
-
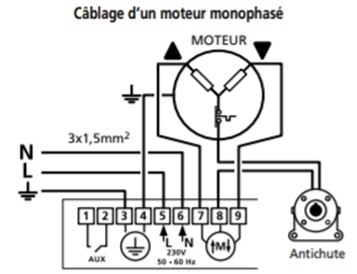
How to wire a SIMUBOX SINGLE-PHASE?
The traction stop must be used
How to wire a SIMUBOX THREE-PHASE?The traction stop must be used. The Secu Mot inputs must be wired for the motor to operate
It's imperative to use a control box
How to wire a THREE-PHASE EI MOTOR?The traction stop must be used. The Secu Ext inputs must be wired for the motor to operate.
How to adjust the end limits of a SINGLE-PHASE motor?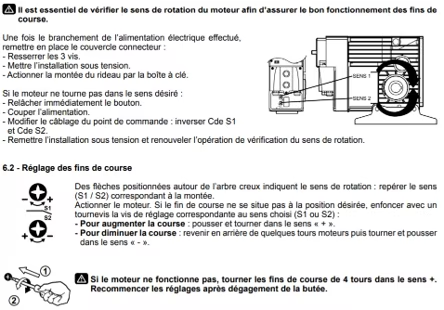
How to adjust the end limits of a THREE-PHASE motor?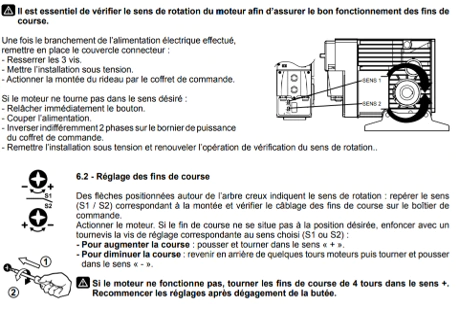
How to adjust the end limits of a THREE-PHASE EI motor?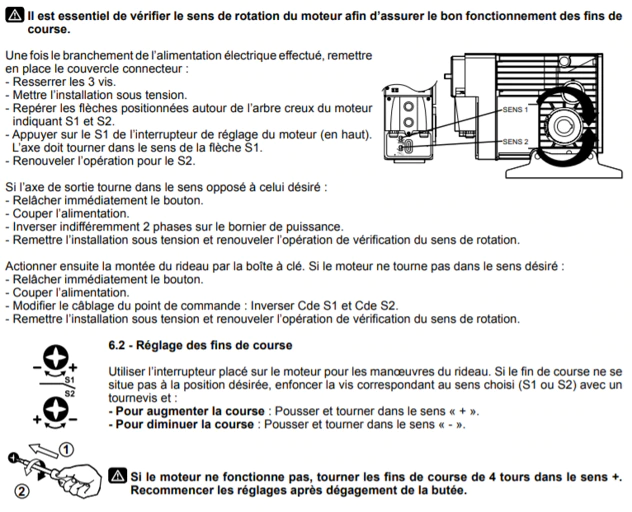
-
The motor does not move
The motor may be in thermal protection: wait for the motorization to cool down.
Ensure the emergency maneuver is released
If the motor does not operate, turn the end limits 4 turns in the + direction. Then perform the End Limit adjustments.
Check the continuity of the anti-drop contact
I can't adjust the end limitsRefer to the manual or tutorial
Motor - DMI5-DMI6
-
How to choose the suitable motor?
Additional informationIn case of using the emergency maneuver, the end limits may shift
Where can I find the product manual? -
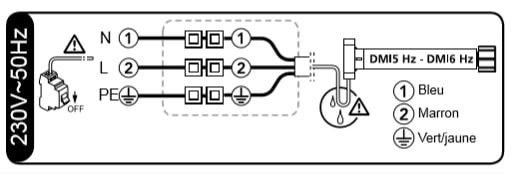
How to wire this product?

How to adjust the end limits?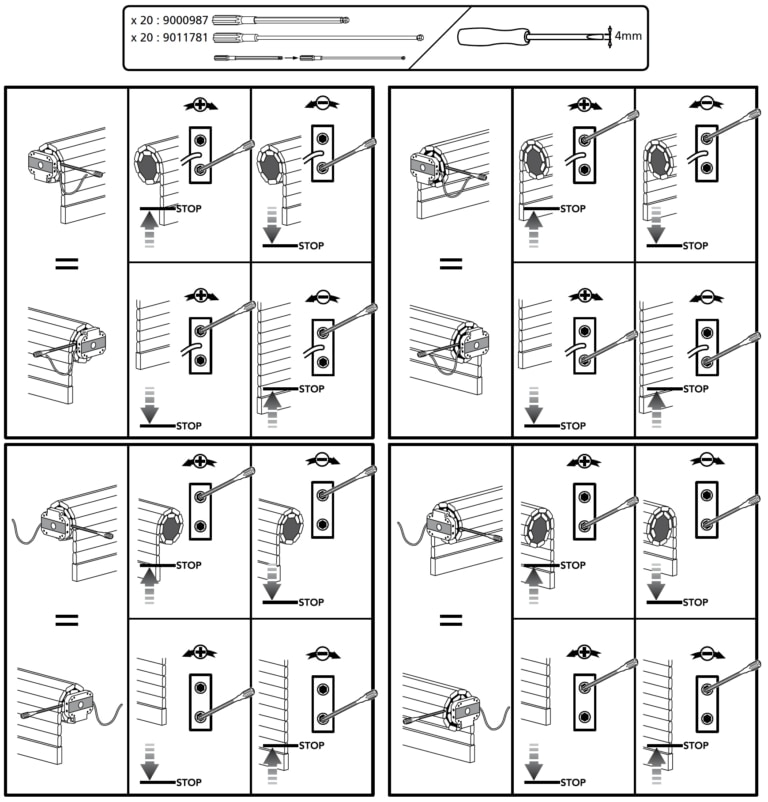
-
The motor only rotates in one direction
1. Check the wiring of your control point
2. Test the motor directly.
The motor stops in mid-cycleYour motor may be in thermal cut-off protection: let it cool down and then try again
The motor has lost its end limits1. Check that the adaptation on the motor head side is correctly fitted into the tube
2. Check that multiple motors are not connected to the same control point
Is the motor still powered when the emergency maneuver is used?Yes, it is still powered
The end limits are offsetIn case of using the emergency maneuver, the end limits may be offset
Motor - DMI5Hz-DMI6Hz
-
How to wire this product?
How to program this product?Work on only one non-programmed motor connected to the power grid:
1. Power on the receiver, the motor moves back and forth
2. Simultaneously press the up and down buttons on a transmitter: the motor moves back and forth
3. If the direction of rotation is inverted, press the STOP button until the motor moves back and forth (at least 3 seconds)
4. Adjust the end limits:
5. Press the PROG button on the transmitter for about one second: the motor moves back and forth
-
The motor no longer stops at the end limits
1. Check the tube/adaptation connection.
2. If you used the emergency maneuver and exceeded the end limit position, your shutter/blind will be offset accordingly. It is necessary to re-adjust the settings.
How to pair a transmitter after the initial one malfunctions?1. Only on the concerned motor, disconnect the power for 3 seconds.
2. Reconnect for 8 seconds.
3. Disconnect the power again for 3 seconds.
4. Reconnect. The motor moves.
5. Press the programming button on the new transmitter until the motor moves back and forth. The new transmitter controls the motor and the end limits have not been modified.
Motor - T3.5 AC
-
WHAT ARE THE DETAILED CHARACTERISTICS OF THE PRODUCT?
How to choose the suitable motor?
-
WHERE CAN I FIND THE PRODUCT MANUAL?
-
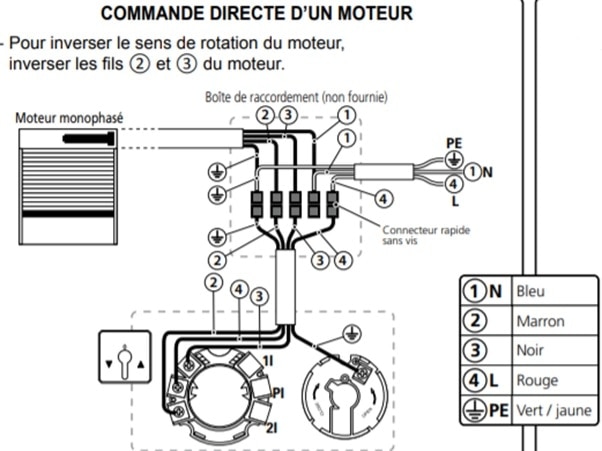
What are the wiring recommendations?

How to wire a standard switch?

If the rotation direction is reversed, switch the brown and black wires.
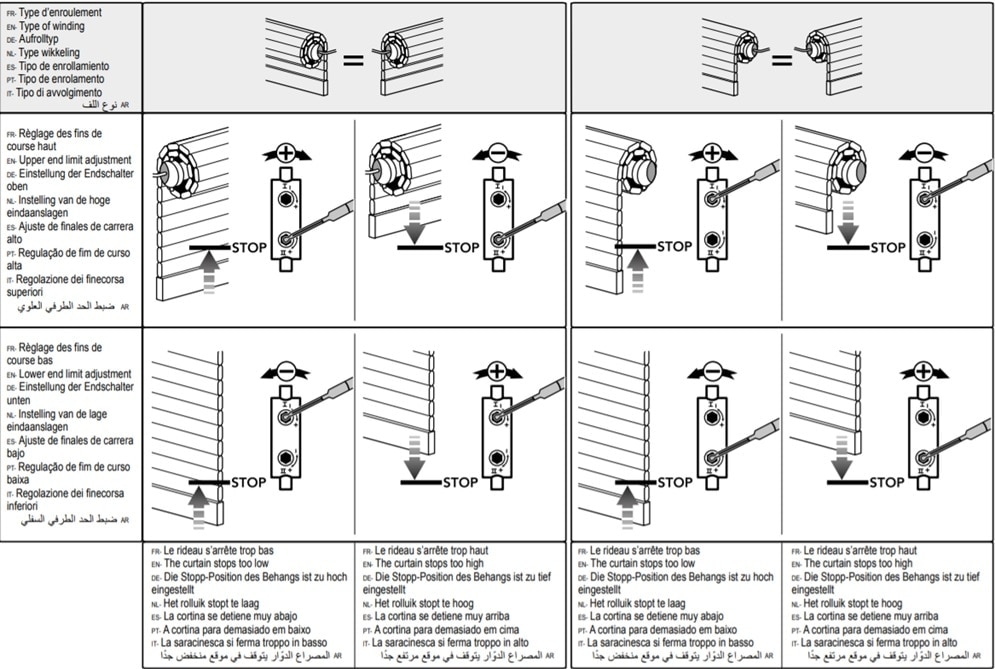
How to adjust the end limits?

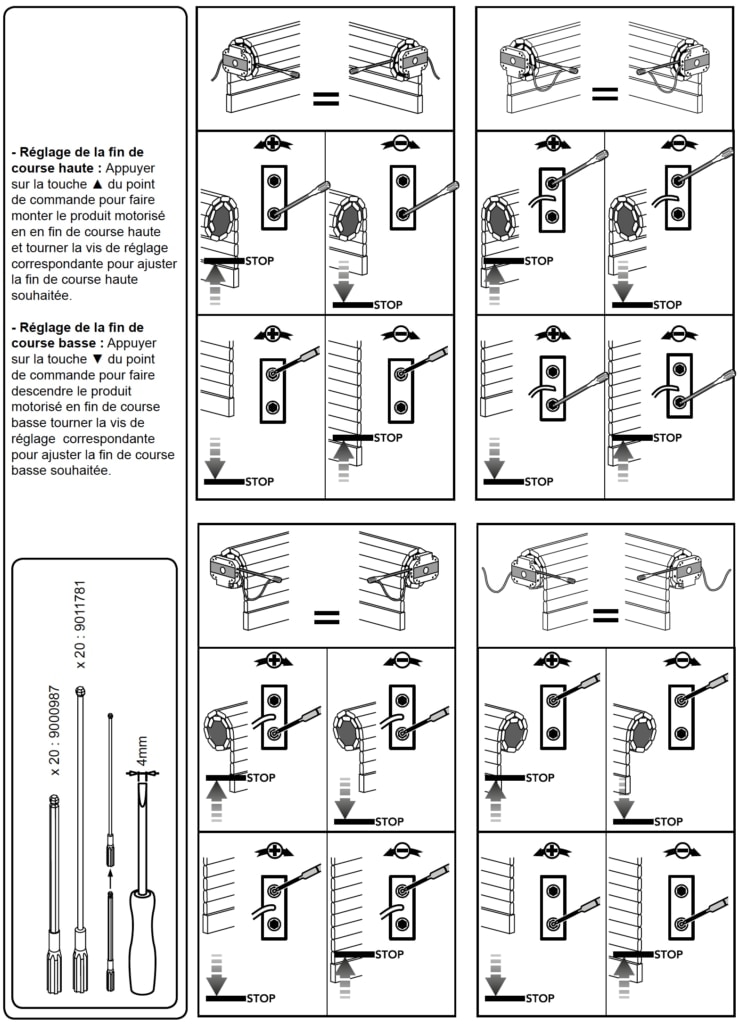
1. High end limit adjustment: press the up button on the control point to raise the motorized product to the high end limit and turn the corresponding adjustment screw to set the desired high end limit.
2. Low end limit adjustment: press the down button on the control point to lower the motorized product to the low end limit and turn the corresponding adjustment screw to set the desired low end limit.
*Tip* To increase the travel, turn the knobs clockwise and vice versa.
-
The motor no longer rotates in the upward direction
Test the motor directly
Motor - T3.5 Hz02
-
WHAT ARE THE DETAILED CHARACTERISTICS OF THE PRODUCT?
How to choose the suitable motor?
-
WHERE CAN I FIND THE PRODUCT MANUAL?
-
How to wire this product?

How to program the motor?1. Simultaneously press the Up/Down buttons until the motor moves back and forth.
2. Check the rotation direction using the Up/Down buttons; if the direction is reversed, press STOP until the motor moves back and forth.
3. Using the Up/Down buttons, position the shutter at the desired lower position: during this operation, continue holding the transmitter buttons down to lower or raise the shutter.
4. Once the shutter is correctly positioned, simultaneously press Stop/Up until the shutter starts. It will rise without keeping pressure on the button.
5. Use the Stop button to stop the shutter at the top.
6. Using the Up/Down buttons, adjust the desired upper position.
7. Once the shutter is correctly positioned, simultaneously press Stop/Down until the shutter starts. It will descend without keeping pressure on the button.
8. When the shutter is midway, press the Stop button and hold it down until the motor moves back and forth (about 5 seconds).
9. Press the programming button until the motor moves back and forth. The motor is programmed.
How to adjust the end limits?1. Let the shutter stop at the end limit position to be modified.
2. Simultaneously press the Up and Down buttons until it moves back and forth.
3. Adjust the end limit position using the Up or Down buttons.
4. Press STOP until the motor moves back and forth to register the new end limit.
How to remove a general control?1. Press the programming button on the individual transmitter until it moves back and forth.
2. Press the programming button on the transmitter to be removed until it moves back and forth. The remote control is deprogrammed.
How to add a general control?1. Press the programming button on the individual control until the motor moves back and forth.
2. Press the programming button on the general remote control until the motor moves back and forth.
3. Repeat the operation on all shutters to be added.
If you have a multi-channel remote control, remember to select the correct channel before pairing.
How to pair a transmitter after the initial one malfunctions or is lost?1. Only on the concerned motor, disconnect the power for 3 seconds.
2. Reconnect for 8 seconds.
3. Disconnect the power again for 3 seconds.
4. Reconnect. The motor moves.
5. Press the programming button on the new transmitter to pair (about 3 seconds) until the motor moves back and forth. Your new transmitter is paired with the motor.
-
Why does the motor not respond to commands?
1. Check the condition of the battery in your remote control
2. Check the power supply
The motor has lost the end limits, what to do?1. Only on the concerned motor, disconnect the power for 3 seconds
2. Reconnect for 8 seconds.
3. Disconnect the power again for 3 seconds.
4. Reconnect. The motor moves.
5. Press the programming button (about 10 seconds) until you get 2 movements back and forth at intervals of a few seconds, the motor is in factory mode and ready to be programmed.
Perform a complete motor programming.
The motor stops after a few seconds of operationCheck the connection between the winding tube and the din ring adapter for the end limit.
The shutter goes in the opposite direction when it reaches the end limit1. Only on the concerned motor, disconnect the power for 3 seconds.
2. Reconnect for 8 seconds.
3. Disconnect the power again for 3 seconds.
4. Reconnect. The motor moves.
5. Press the programming button (about 10 seconds) until you get 2 movements back and forth at intervals of a few seconds, the motor is in factory mode and ready to be programmed.
Perform a complete motor programming.
Motor- T5-T6
-
WHAT ARE THE DETAILED CHARACTERISTICS OF THE PRODUCT?
Which motor to choose?
What is the compatibility with a wired control point from another brand?Check with the manufacturer of the control point using the characteristics of our products.
-
What are the connection recommendations?

How to wire with a standard switch?
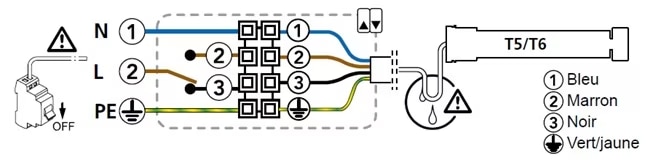
If the rotation direction is reversed, switch the brown and black wires.
How to adjust the end limits?

1. High end limit adjustment: press the up button on the control point to raise the motorized product to the high end limit and turn the corresponding adjustment screw to set the desired high end limit.
2. Low end limit adjustment: press the down button on the control point to lower the motorized product to the low end limit and turn the corresponding adjustment screw to set the desired low end limit.
*Tip* To increase the travel, turn the knobs clockwise and vice versa.
-
The power trips
Test the motor directly.
The motor struggles to raiseCheck the motor torque according to the weight of the curtain.
Check for any hard points.
The shutter does not hold its high end limit positionContact your dealer. Replace the motor.
The motor no longer stops at its end limitAdjust the end limits: refer to the adjustment section.
-
How to replace a T5 / T6 motor?
Check if the reducer output is compatible with the new motor. If not, also replace the set of adaptations.
Commande - Digicode Hz (ANTERIOR PRODUCT)
-
Which motors is this product compatible with?
Compatible with all Simu HZ or Somfy RTS radio motors
-
How to program this product on a roller shutter motor?
1. Open the digicode with the provided key
2. Press the RESET button on the digicode for more than 1 second (behind the keypad)
3. Open the motor's memory with its individual transmitter: press 3s on PROG => the motor moves one way and then the other.
4. Enter the factory code (000000) on the digicode
5. Briefly press the SET button
6. Press the PROG button on the digicode for more than 1 second (behind the keypad) => 1 light blinks
7. During blinking, press on the chosen channel (1 of the 2 large buttons) on the digicode until the motor moves back and forth
8. The digicode is programmed. The factory code can be changed
How to program this product on an RSA?1. Open the digicode with the provided key
2. Press the RESET button on the digicode for more than 1 second (behind the keypad)
3. Unlock the digicode by entering the factory code (000000)
4. Select the P8 parameter of the RSA
5. Hold down on the chosen channel (1 of the 2 large buttons) on the digicode => the 00 of the RSA becomes fixed and without releasing, press + on RSA until 2 dashes appear.
6. The digicode is programmed. The factory code can be modified
How to program this product on a GM 600?1. Open the digicode with the provided key
2. Press the RESET button on the digicode for more than 1 second (behind the keypad)
3. Unlock the digicode by entering the factory code (000000)
4. Press button B on the GM until the light turns on
5. Press on the chosen channel (1 of the 2 large buttons) on the digicode => the light blinks for 5s and turns off
6. Modify the factory code
How to program this product on a GM 800?1. Open the digicode with the provided key
2. Press the RESET button on the digicode for more than 1 second (behind the keypad)
3. Unlock the digicode by entering the factory code (000000)
4. Press the PROG button on the GM until the light turns on
5. Press on the chosen channel (1 of the 2 large buttons) on the digicode => the light blinks for 5s and turns off
6. Modify the factory code
How to program this product on a GM 1000?1. Open the digicode with the provided key
2. Press the RESET button on the digicode for more than 1 second (behind the keypad)
3. Unlock the digicode by entering the factory code (000000)
4. Press the PROG button on the GM for 2S => the light turns on and F0 is displayed
5. Press on the chosen channel (1 of the 2 large buttons) on the digicode => the light blinks for 5s and 2 dashes appear on the screen, then C1 is displayed
6. Modify the factory code
How to modify the main code?1. Enter the factory code 000000 and confirm with the SET button
2. Press the SET button until the lower indicator blinks
3. Enter the new code and confirm with the SET button
4. Confirm the new code and confirm again with the SET button
5. The code is changed
Motor - CENTRIS veoHz radio central motor (ANTERIOR PRODUCT)
-
The installation of the motor on the tube is the same as a wired Centris.
The battery life of the control points is at least 2 years.
When the battery is low, 2 signals appear:
– A change in the flashing LED indicates that the battery is low.
– When you need to restart the motor movement every 3 seconds, the transmitter battery needs to be replaced.
– The remote control and the control box are specific to veoHz (SIMU radio protocol at 434MHz, not compatible with Hz).
– Centris veoHz cannot be controlled by any other control points except veoHz transmitters and vice versa.
– These control points can transmit continuously for 60 seconds.
– Motor settings can be made from all veoHz control points (3 ergonomic SIMU buttons).
– Mobile transmitters have a very short range that can be adjusted during installation.
– By default, the transmitters are set to threshold 2 and have a short radio range.
– 4 thresholds are available, with threshold 4 corresponding to the longest radio range.
– If the radio range is too short or too long, it can be adjusted, but it must guarantee insightful control of the shutter. (more details in the motor adjustment video).
Connecting wired control points, sensors, automation, or safety accessories is not possible as it is not necessary.
The mixed mode (ascending in impulse mode) is strictly prohibited on grilles or curtains with a hanging point.
In case of a prolonged power outage, the curtain can only rise to the upper stop points (stops are mandatory). Centris veoHz will then operate as usual.
Command - LiveIn2 connected solution (ANTERIOR PRODUCT)
-
As a replacement for LiveIn2, SIMU Hz and BHz products and accessories become compatible with Somfy's TaHoma® Switch
 As a replacement for LiveIn2, SIMU Hz and BHz products and accessories become compatible with Somfy's TaHoma® SwitchAs a replacement for LiveIn2, SIMU Hz and BHz products and accessories become compatible with Somfy's TaHoma® Switch
Motor - MSR (ANTERIOR PRODUCT)
-
Instructions
The setting of the limit switches for this motor is automatic and requires the presence of rigid attachments/locks and stops on the final blade or in the guides.
How to reset a previously configured motor?1. Remove the motor from the shaft and press the red tab
2. Using a 2mm Allen key, proceed as follows:
– Insert the key into the yellow screw socket, push on the key while simultaneously turning it clockwise.
– Insert the key into the white screw socket, push on the key while simultaneously turning it counterclockwise
3. Return the motor and tube to their initial position and reattach the curtain
4. Rotate the motor in the "up" direction: it will make clack cla clack sounds... Since it operates at reduced torque during the first cycle, help it reach its upper stops by lifting the curtain.
5. Complete a full cycle to verify proper operation.
How to reset an already configured motor?1. With the roller in the lower position, detach the curtain
2. Rotate the motor in the "up" direction until you hear "clack clack clack"...
3. Fix the curtain to the shaft
4. Rotate the motor in the "up" direction; the motor will make clack cla clack sounds... If the motor stalls during the opening cycle, assist it by lifting the curtain until it reaches the upper stop.
5. Complete a full cycle to verify proper operation.
T5 AUTOThe MSR was marketed with 2 different heads: octagonal or with retention pegs:see
If your installed motor does not have pegs, you will need to replace the support with reference 9001108
Moteur - Axialis (ANCIEN PRODUIT)
-
What product replaces an Axialis motor?
To replace an obsolete Axialis motor, you can use the T8S and T8SDMI motors if the installation allows. The T8S and T8 SDMI motors have a manual operation as well as a narrow head with a thickness of 43mm. However, the T8S and T8 SDMI motors no longer have the “anti-fall” function. Note that with this range, your curtain will no longer be balanced and thus not manually disengage; you will need to use a crank.
Control board - RSA Hz & RSA Hz PRO (ANTERIOR PRODUCT)
-
What product to choose?
This depends on the power of the motor.
If the motor's power is above 750 Watts, you should choose the RSA PRO.
Consult the product sheet for more information.
Click here: Product sheet
Which motors and control points is this product compatible with?Compatibility with Somfy products
The RSA Hz is compatible with RTS remote controls and wired Somfy motors with mechanical limit switches.
Compatibility with SIMU motors
The RSA Hz is compatible with all SIMU single-phase wired motors with mechanical limit switches except the SIMUBOX range.
-
-
Simple programming of RSA Hz and RSA Hz PRO
Discover the programming guide
HOW TO WIRE A PRESSURE BAR?Explanation in a diagram:
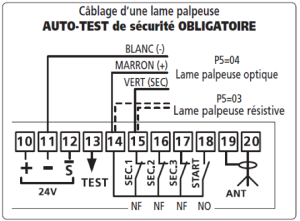
HOW TO ENABLE A PRESSURE BAR?Optical or resistive:
Optical pressure blade: Parameter P1 = 02
Parameter P5 = 04
Resistive pressure blade: Parameter P1 = 02
Parameter P5 = 03
HOW TO WIRE A SIGNALLING LIGHT OR/AND ZONE LIGHTING?The steps to follow:
Without zone lighting: PA 03
With zone lighting: PA 04
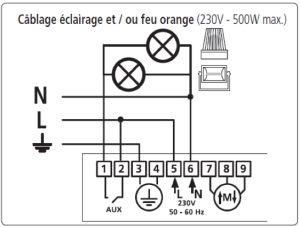
To download the manual click here
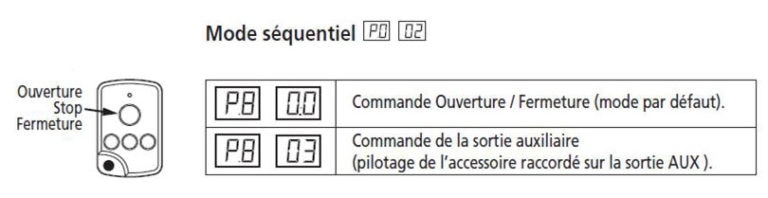
HOW TO CONNECT A SEQUENTIAL CONTROL POINT?To use a sequential mode, set P0 to 00, 01, 02 or 03
1. Go to parameter P8, 00 blinks.
2. Press the button of your remote control until 00 remains fixed.
3. Without releasing the remote control button, press the + button on the box until two dashes (–) appear.
4. Release then scroll with the up/down arrows to C1 and test your remote control.
5. Repeat the operation with the other remote controls.
HOW TO ADD A FUNCTIONAL REMOTE?The steps to follow:
1. Press the programming button of the individual control until the motor moves back and forth.
2. Press the programming button of the functional remote until the motor moves back and forth.
3. Repeat for all other remotes to be added.
If you have a multi-channel remote control, don’t forget to select the correct channel before pairing.
Click here to see the YOUTUBE tutorial
HOW TO PAIR A TRANSMITTER AFTER A MALFUNCTION OR LOSS OF INITIAL SETTINGS?The steps to follow:
1. Only on the concerned motor, disconnect the power for 3 seconds.
2. Reconnect power for 8 seconds.
3. Disconnect power again for 3 seconds.
4. Reconnect power to the motor. The motor makes a movement.
5. Press the PROG (programming) button for about 10 seconds until you get 2 back-and-forth movements a few seconds apart, the motor is in factory mode and ready to be programmed.
Click here to see the YOUTUBE tutorial
-
What do the error codes mean?
List of operating information displayed by the RSA Hz receiver allowing for quick visualization and diagnosis of the installation's status
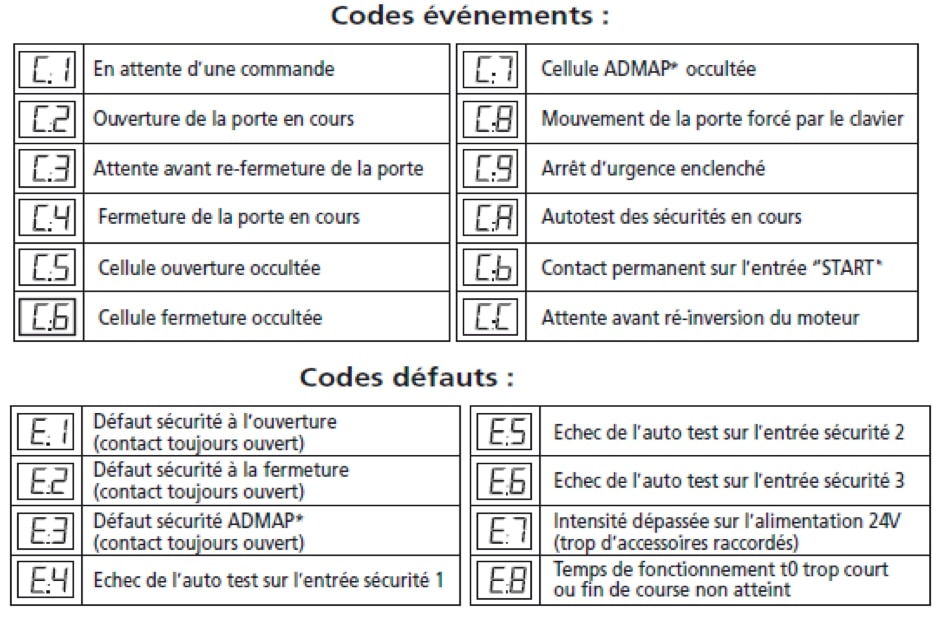
ERROR CODE C6Steps to follow to disable the sensors:
Set parameters P2 and P6 to 00
It is imperative to replace the safety devices to comply with the standards and to alert the user of the situation and risk.
ERROR CODE E2Steps to follow to disable the pressure blade:
Set parameters P1 and P5 to 00
It is imperative to replace the safety devices to comply with the standards and to alert the user of the situation and risk.
ERROR CODE E8Steps to follow:
Operating time too short. Set parameter t0 slightly above the operating time of the door. (In seconds)
MUST HOLD DOWN BUTTON ON REMOTE TO CLOSE DOORSteps to follow:
Security issue, check your accessories and error codes.
MOTOR STOPS IN THE MIDDLE OF CYCLE WITHOUT ERROR CODEWhat to do:
If the motor stops mid-cycle and the box shows no defects, the problem is related to the motor (windings or capacitor).
Contact your supplier for repair or replacement of the motor.
Motor - T5 Auto
-
What are the detailed characteristics of the product?

Which motor should you choose? -
Where can I find the manual for the product?
-
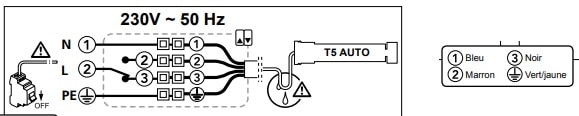
How to wire this product?

How to program this product?Only work on one unprogrammed motor connected to the power supply:
1. Turn on the motor, the motor makes a back and forth movement.
2. Press simultaneously the up and down buttons of a transmitter: the motor makes a back and forth movement.
3. If the direction of rotation is reversed, press the STOP button until the motor operates back and forth (minimum 3 seconds).
4. Press simultaneously the up and down buttons of a transmitter: the motor makes a back and forth movement.
5. Press STOP for 2 seconds => the motor makes a back and forth movement.
6. Press the PROG button of the transmitter for about 1 second: the motor makes a back and forth movement.
How to add a control point?1. Press the programming button of the individual control until the motor moves back and forth.
2. Press the programming button of the remote control to be added until the motor moves back and forth.
3. Repeat the operation on all shutters to be added.
If you have a multi-channel remote control, do not forget to select the correct channel before pairing.
Click here to see the YOUTUBE tutorial
How to pair a transmitter after malfunction or loss of initial?Steps to follow:
1. Only on the concerned motor, disconnect the power for 3 seconds.
2. Reconnect the power for 8 seconds.
3. Disconnect the power again for 3 seconds.
4. Then reconnect the power to the motor. The motor makes a movement.
5. Press the PROG button for about 10 seconds until you get 2 movements back and forth with a few seconds interval.
Your motor is programmed.
Click here to see the YOUTUBE tutorial
-
How to troubleshoot?
Check the status of the remote control battery.
Check the power supply.
Contact for repairs or replacementsIf you encounter any issues, please reach out for assistance or replacements.
Motor - T5 Hz02
-
What are the detailed characteristics of the product?
What is the difference with a T5 EHZ?The T5 Hz02 motor offers only a manual programming mode for the limit switches, unlike a T5 Ehz motor which offers 4 modes for adjusting the limit switches: manual, automatic or 2 semi-automatic modes
Compatible with all Simu Hz and Somfy RTS control points
-
Where can I find the product manual?
-
How to wire this product?
How to program this product?1. Press the Up/Down buttons simultaneously until the motor moves back and forth.
2. Check the direction of rotation using the Up/Down buttons; if the direction is reversed, press stop until the motor moves back and forth.
3. Using the Up/Down buttons, position the blind at the desired low position: during this operation, the button must be held down to lower or raise the blind.
4. Once the blind is correctly positioned, press Stop/Up simultaneously until the blind starts. It will rise without holding the button.
5. Using the Stop button, stop the blind at the top.
6. Using the Up/Down buttons, adjust the desired high position.
7. Once the blind is correctly positioned, press Stop/Down simultaneously until the blind starts. It will descend without holding the button.
8. When the blind is halfway up, press the Stop button and hold it until the motor moves back and forth (about 5 seconds).
9. Press the programming button until the motor moves back and forth. The motor is programmed.
How to add a master control?1. Press the programming button of the individual control until the motor moves back and forth.
2. Press the programming button of the master remote until the motor moves back and forth.
3. Repeat the operation on all the blinds to be added.
If you have a multi-channel remote, don't forget to select the correct channel before pairing.
How to delete a master control?1. Press the programming button of the individual remote until the motor moves back and forth.
2. Press the programming button of the remote to be deleted until the motor moves back and forth.
The remote is unprogrammed.
-
The motor no longer responds to commands
1. Check the status of the battery in your remote control
2. Check the power supply
Motor - T5 Autoshort Hz
-
What are the detailed characteristics of the product?
Which motor should you choose?
What control points is this motor compatible with?Compatible with all Simu Hz and Somfy RTS control points
-
Where can I find the product manual?
-
How to wire this product?
How to program this product?Only work on one unprogrammed motor connected to the power supply:
1. Power the motor, the motor moves back and forth.
2. Press the up and down buttons of a transmitter simultaneously: the motor moves back and forth.
3. If the direction of rotation is reversed, press the STOP button until the motor moves back and forth (minimum 3 seconds).
4. Press the up and down buttons of a transmitter simultaneously: the motor moves back and forth.
5. Press STOP for 2 seconds => the motor moves back and forth.
6. Press the PROG button of the transmitter for about 1 second: the motor moves back and forth.
How to add a control point?1. Press the programming button of the individual control until the motor moves back and forth.
2. Press the programming button of the remote control to be added until the motor moves back and forth.
3. Repeat the operation on all shutters to be added.
If you have a multi-channel remote control, do not forget to select the correct channel before pairing.
How to pair a transmitter after a malfunction or loss of initial settings?1. Only on the concerned motor, disconnect the power for 3 seconds.
2. Reconnect power for 8 seconds.
3. Disconnect power again for 3 seconds.
4. Then reconnect the power. The motor makes a back and forth movement.
5. Press the PROG button of the new transmitter to be paired (for about 3 seconds) until you obtain a back and forth movement of the motor.
How to REMOVE A CONTROL POINT?
1. Press the programming button of the individual transmitter until the motor moves back and forth.
2. Press the programming button of the transmitter to be deleted until the motor moves back and forth.
The remote control is unprogrammed.
-
The motor does not respond to commands
1. Check the status of the battery in your remote.
2. Check the power supply.
I am lost in the programming– If the hold on the buttons of your remote is necessary, programming has not been finalized:
1. Perform a simultaneous press of about 1 second on the up/down buttons = the motor moves back and forth.
2. Perform a press on STOP = the motor moves back and forth.
3. Perform a press on the programming button = the motor moves back and forth.
The motor no longer stops at its limit switchesCheck the condition of the stops and replace them, as limit switches rely on force to stop the motor. These are found on the final blade or within the guides.
Motor - T5 EHz - T5 EBHz - T3.5 EBHz
-
What are the detailed characteristics of the product?
Visit the dedicated product page
T5E Hz: View the product sheet
T5E BHz: View the product sheet
T3.5E BHz: View the product sheet
-
Which motor should you choose?
-
What is the compatibility between Hz and BHz?
Hz motors can only be driven by Hz transmitters, and BHz motors can only be driven by BHz transmitters. The interoperability of the two systems is done with the use of a LiveIn2 box.
The Hz and BHz transmitters are differentiated by the color of the LED => red for the Hz protocol and green for the BHz protocol.


-
WHERE TO FIND THE PRODUCT MANUAL?
T5E Hz: See the manual
T5E BHz and T3.5EBHz: See the manual
-
How to ADD A DIGICODE?
The steps to follow:
1. Open the digicode using the key provided
2. Press and hold the RESET button on the digicode (behind the keypad) for more than a second.
3. Open the memory of the motor with its individual transmitter: press PROG for 3 seconds => the motor turns one way and then the other.
4. Enter the factory code (000000) on the digicode
5. Press the SET button briefly
6. Press and hold the PROG button on the digicode (behind the keypad) until the LED blinks.
7. While blinking, press the chosen channel button (1 of the 2 large buttons) until the motor moves back and forth.
8. The digicode is programmed. The factory code can be modified.
Click here to see manual ref. 5050593A-Digicode SAHz
How to ADD A MASTER REMOTE?The steps to follow:
1. Press the PROG (programming) button of the individual control until the motor moves back and forth.
2. Press the PROG (programming) button of the master remote for 1 second, the motor moves back and forth to confirm the addition.
3. Repeat the operation for all shutters to add.
If you have a multi-channel remote control, do not forget to select the correct channel before pairing.
Click here to see the YOUTUBE tutorial
How to ADD A TSA+ REMOTE?The steps to follow:
1. Press the PROG (programming) button of the individual control until the motor moves back and forth.
2. At the same time, press the LEFT and RIGHT buttons of the TSA remote until the LED blinks.
3. While the LED is blinking, press one of the 4 buttons on the TSA remote until the motor moves back and forth.
Your remote is paired.
How to ADD A 2ND CONTROL POINT?The steps to follow:
1. Press the PROG (programming) button of the individual control until the motor moves back and forth.
2. Press the PROG (programming) button of the control to be added for 1 second, the motor moves back and forth to confirm the addition.
Your new transmitter is paired with the motor.
Click here to see the YOUTUBE tutorial
How to pair a transmitter after malfunction or loss of initial settings?The steps to follow:
1. Only on the concerned motor, disconnect the power for 3 seconds.
2. Reconnect the power for 8 seconds.
3. Disconnect the power again for 3 seconds.
4. Then reconnect the power to the motor. The motor will make a movement back and forth.
5. Press the PROG (programming) button of the new transmitter to be paired (for about 3 seconds) until you obtain a movement of the motor.
How to REMOVE A CONTROL POINT?
The steps to follow:
1. Press the programming button of the individual transmitter until the motor moves back and forth.
2. Press the programming button of the transmitter to be deleted until the motor moves back and forth.
The remote control is unprogrammed.
WHAT MODE OF LIMIT SWITCH ADJUSTMENT TO CHOOSE?Discover the 4 different ways to adjust your motor from the range of electronic radio motors depending on your installation.
– ALL AUTOMATIC mode, SEMI-AUTOMATIC LOW, SEMI-AUTOMATIC HIGH, and MANUAL mode
Click here to see the YOUTUBE tutorial
How to PROGRAM THE MOTOR IN MANUAL MODE?1. Press the UP and DOWN buttons simultaneously until the motor moves back and forth.
2. Check the direction of rotation using the UP and DOWN buttons; if the direction is reversed, press the STOP button until the motor moves back and forth (at least 3 seconds).
3. Use the UP and DOWN buttons to position the roller at the desired lower position; during this operation, keep pressing the transmitter buttons to lower or raise the roller.
4. Once the roller is correctly positioned, press the STOP and UP buttons simultaneously until the roller starts to rise (do not keep pressing the button).
5. Use the STOP button to stop the roller at the top.
6. Use the UP and DOWN buttons to adjust the desired upper position.
7. Once the roller is correctly positioned, press the STOP and DOWN buttons simultaneously until the roller starts to descend (do not keep pressing the button).
8. When the roller is halfway up, press the STOP button and hold until the motor moves back and forth (around 5 seconds).
9. Press the PROG button until the motor moves back and forth. The motor is programmed.
Click here to see the YOUTUBE tutorial
How to troubleshoot?Check the status of the remote control battery.
Check the power supply.
Contact for repairs or replacementsIf you encounter any issues, please reach out for assistance or replacements.
Motor - T8-T8M
-
What are the detailed characteristics of the product?
Which motor to choose? -
Where to find the product manual?
-
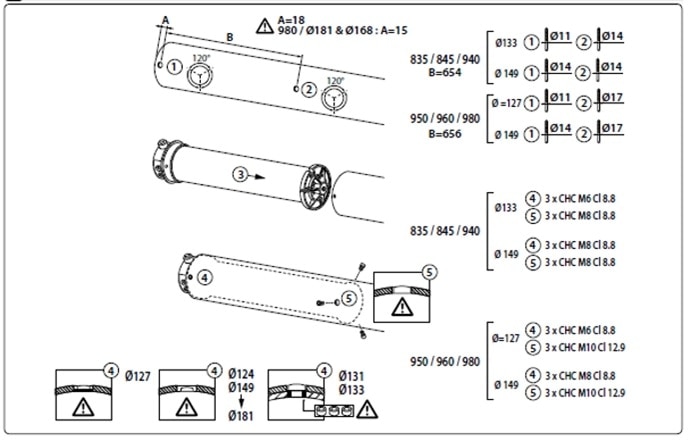
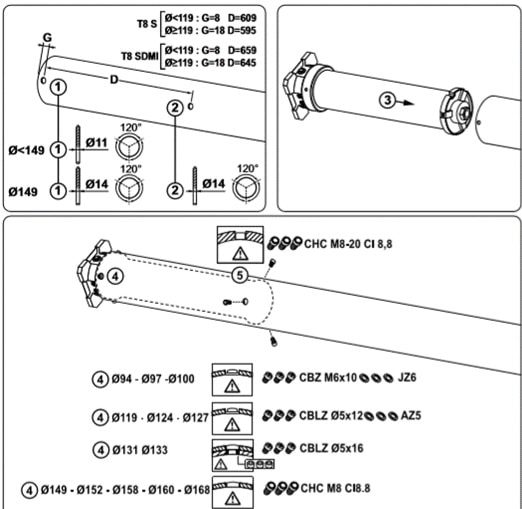
How to install the motor in the tube?
Installation for motors equal to or less than 300Nm
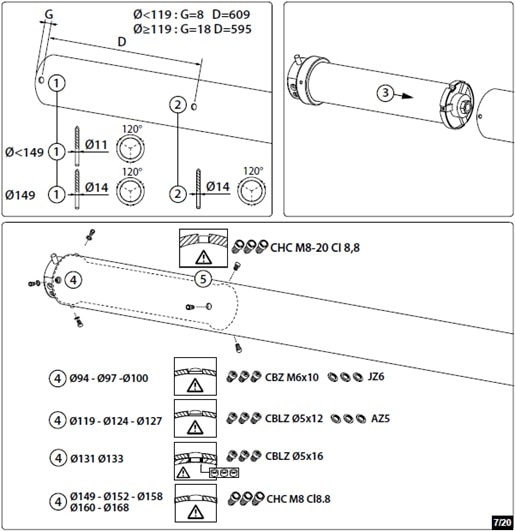
Installation for motors greater than 300Nm
How to wire this product?With control point

With RSA hz Pro
How to identify the limit switches?
How to check the rotation direction?
How to adjust the limit switches?
-
The limit switches are out of adjustment
Check that the adaptation on the motor head side is properly fixed to the motor base ring with 3 screws at 120°. Check that the tube on the motor head side is properly fixed to the adaptation with 3 screws at 120° (The screw heads must be recessed in the tube drilling).
2. Ensure that multiple motors are not connected to the same control point.
The motor only turns in one directionCheck the wiring of your control point and test the motor directly.
The motor no longer responds to the control1. In the case of a motor equipped with a backup maneuver, check that it is not engaged.
2. Ensure that the motor is powered and correctly wired.
3. Test the motor directly
4. The motorization may be in thermal cut-off: wait for the motor to cool down
5. Check that your motor is not at the end of the safety stroke: make ten turns in the plus direction on both knobs.
6. Check the continuity of the anti-fall contact.
Motor - T8S-T8SDMI
-
What are the detailed characteristics of the product?
Which motor to choose? -
Where can I find the product manual?
-
How to install the motor in the tube?
How to wire this product?With a control point (key switch)
With RSA hz Pro

How to adjust the limit switches?
-
The limit switches are misaligned
1. Check that the adapter on the motor head side is correctly fixed to the base ring of the motor with 3 screws at 120°. Check that the tube on the motor head side is correctly fixed to the adapter with 3 screws at 120° (the screw heads must be recessed in the tube's drilling).
2. Ensure that multiple motors are not connected to the same control point.
The motor only turns in one directionCheck the wiring of your control point and test the motor directly.
The motor no longer responds to the control1. In the case of a motor equipped with an emergency operation, check that it is not engaged.
2. Verify that the motor is powered and correctly wired.
3. Test the motor directly.
4. The motorization may be in thermal cut-off: wait for the motor to cool down.
5. Check that your motor is not at the safety limit: Make ten turns in the positive direction on both knobs.
6. Check the continuity of the anti-fall switch contact.
-
To replace an obsolete Axialis motor, you can use the T8S and T8SDMI motors if the installation allows it. The T8S and T8SDMI motors have a manual operation as well as a narrow head with a thickness of 43mm. However, the T8S and T8SDMI motors no longer have the "anti-fall" and "disengagement" functions.
-
To replace an obsolete Hercule motor, you can use the T8S and T8SDMI motors. The T8S and T8SDMI motors have a manual operation as well as a narrow head with a thickness of 43mm.
Motor - T9-T9M
-
What are the detailed characteristics of the product?
Which motor to choose? -
Where can I find the product manual?
-
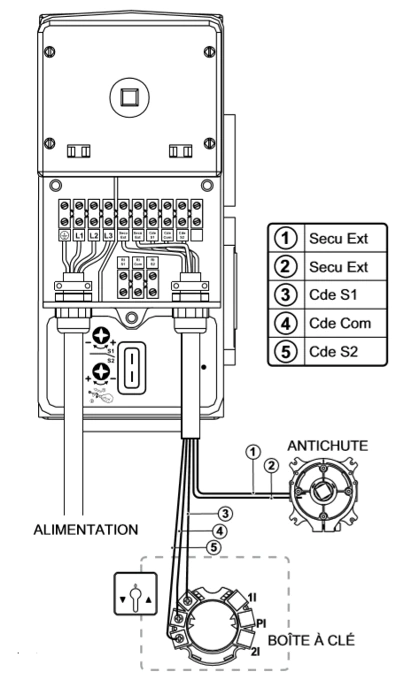
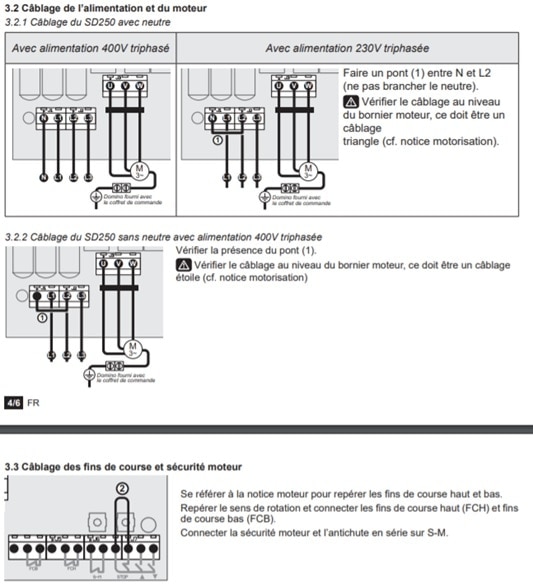
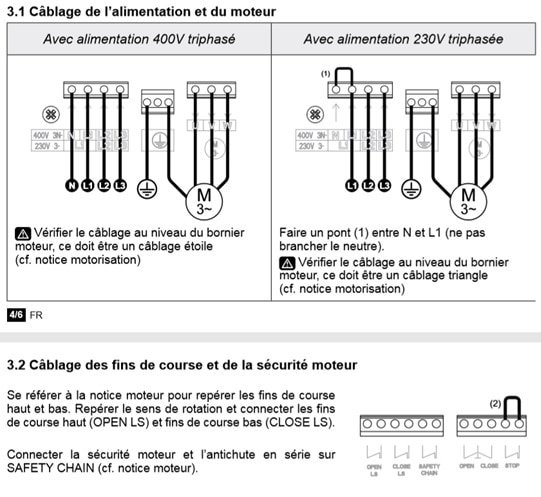
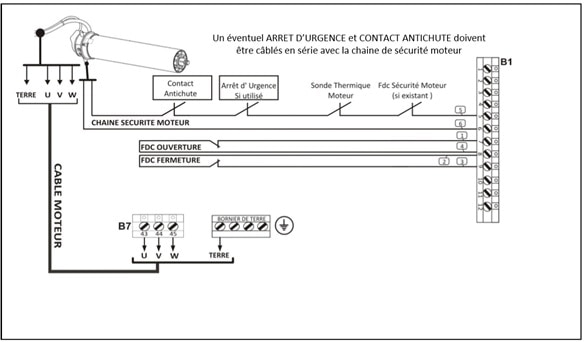
How to wire this product with SD 250?
How to wire this product with SD 350?
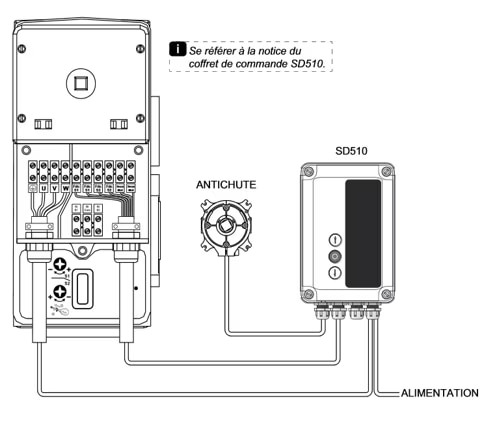
How to wire this product with SD510?
How to adjust the limit switches?
-
The limit switches are misaligned
Check that the motor adapter is securely fastened to the base ring of the motor with 3 screws at 120°. Check that the winding tube on the motor head side is properly fixed to the adapter with 3 screws at 120°. (The heads of the screws must be recessed in the tube's hole)
The motor no longer responds to the control1. In the case of a motor equipped with an emergency maneuver, check that it is not engaged.
2. Ensure that the control box is powered and correctly wired.
3. Check the setting of limit switches: the safety limit switch may be engaged: make 4 turns in the + direction on each adjustment knob.
4. Test the motor directly after bridging the limit switch inputs (wires 1/2 and 3/4 of the motor) and bridge the safety input.
5. The motorization may be in thermal cut-off: wait for the motor to cool down.
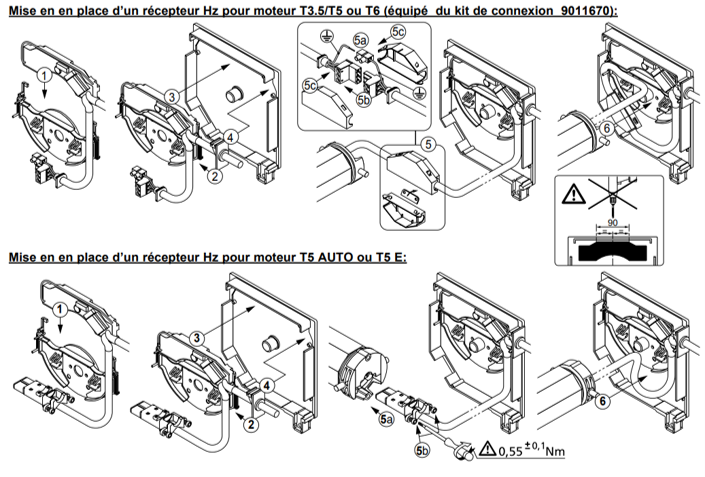
Receiver - Hz
-
-
Which motors and control points is this product compatible with?
The remote receptor is compatible with all Simu Hz and Somfy RTS transmitters
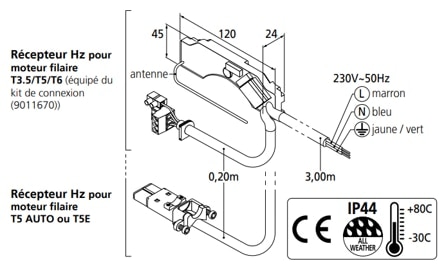
For all wired motors T3.5, T5, T6: choose reference 2004873
For motors T5 AUTO and T5E: choose reference 2004875
-
Where can I find the product manual?
-
How to add a keypad?
1. Open the keypad using the provided key
2. Press and hold the RESET button on the keypad located behind the keypad for more than one second
3. Enter the factory code (000000) on the keypad
4. Select channel 1 or 2 (large black button located at the top of the keypad)
5. Open the memory of the receptor with its individual transmitter: press and hold PROG for 3 seconds => the motor rotates in one direction and then the other.
6. Press the programming button on the keypad (behind the keypad) until the selected channel flashes.
7. While flashing, press the channel button until the motor goes up/down
8. The keypad is programmed. The factory code can be modified (manual 5050593)
How to add a master control?1. Press the programming button of the individual control until the motor moves back and forth.
2. Press the programming button of the master remote control until the motor moves back and forth.
3. Repeat the operation on all the shutters to be added.
If you have a multi-channel remote control, do not forget to select the correct channel before pairing
How to reverse the direction of rotation in operation mode?It is not possible to reverse the direction of rotation in operation mode. You need to perform a programming cancellation followed by a new programming.
1. Only on the affected receptor, disconnect the power for 3 seconds.
2. Reconnect for 8 seconds.
3. Disconnect the power again for 3 seconds.
4. Reconnect. The motor makes a movement.
5. Press the programming button (for about 10 seconds) until you get 2 back and forth movements a few seconds apart.
6. The receptor is deprogrammed, proceed to program it again
7. Press simultaneously the up and down buttons of a transmitter: the motor moves back and forth
8. If the direction of rotation is reversed, press the STOP button until the motor moves back and forth (at least 3 seconds)
9. Press for about one second the PROG button of the transmitter: the motor moves back and forth
How to wire this product?
-
How to program this product?
Only work on one unprogrammed receptor connected to the electrical network:
1. Turn on the receptor, the motor makes a back and forth movement
2. Press simultaneously the up and down buttons of a transmitter: the motor makes a back and forth movement
3. If the direction of rotation is reversed, press the STOP button until the motor moves back and forth (at least 3 seconds)
4. Press for about one second the PROG button of the transmitter: the motor makes a back and forth movement
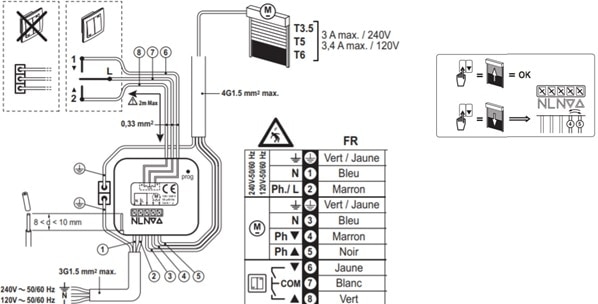
Receiver - Micro receiver Hz
-
What are the detailed characteristics of the product?
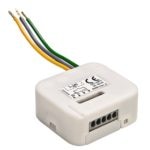
Which motors is the micro-receptor for roller shutters compatible with?All wired SIMU or SOMFY motors with a current not exceeding 3A at 240V and 3.4A at 120V
Which control points is this product compatible with?With the entire range of Simu-Hz or Somfy RTS transmitters
-
Where can I find the manual for the Hz micro-receptor for roller shutter?
Where can I find the manual for the Hz micro-receptor for lights? -
-
1. Press the PROG button on the receptor for 3 seconds, the lighting will turn on for 2 seconds
2. Press the PROG button on the new transmitter for 1 second, the lighting will turn on for 2 seconds
-
Press the PROG button on the receptor for more than 7 seconds, the motor will perform a first back-and-forth movement, then a second one shortly afterward
-
Press the PROG button on the receptor for more than 7 seconds, the lighting will turn on for 2 seconds twice in a row
Receiver - 433Mhz (ANTERIOR PRODUCT)
-
Is this product compatible with current remote controls?
No, the radio protocol is different
-
Where to find a replacement remote?
Simu no longer markets this product and current remote controls are not compatible
-
What can replace this product?
This product can be replaced by an SD100 Hz
-